Description
These little Kermit cake pop treats are perfect for everyone, but I especially love them for little kids at parties.
Ingredients
Scale
- 1 box cake mix (bake as directed on box for 13x9 cake)
- 1 16 oz of ready made frosting
- wax paper
- baking sheets
- green candy coating
- white candy coating
- red candy coating
- small round candy with white shell (such as white sixlets)
- Green jumbo diamond sprinkles
- pink jumbo diamond sprinkles (broken in half)
- black edible ink pen
- squeeze bottle
- toothpicks
- paper lollipop sticks
- styrofoam block
Instructions
- After cake is baked and cooled completely, crumble into a large bowl.
- With a large spoon, mix thoroughly with about 3/4 of the can of frosting. You won’t need the rest.
- Roll mixture into quarter size cake balls and place on a wax paper covered baking sheet.
- Place cake balls in the freezer for about 15 minutes to firm up. You can transfer them to the fridge to keep chilled and avoid freezing.
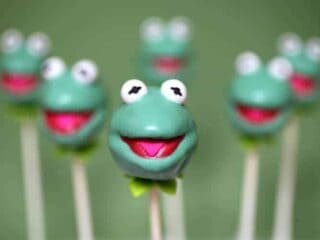
- When they are firm, shape the cake balls to resemble Kermit’s head. Start out by shaping them to look like a teardrop.
- Use a picture of Kermit as a guide to help shape the cake ball. You can also use a lollipop stick to help shape the mouth. Press the stick into the pointed end of the teardrop shape to make an opening in the mouth. Continue shaping to form an open mouth with a defined top and bottom.
- Return cake pops to the fridge to maintain firmness.
- Melt green candy coating in a heat-proof plastic bowl so that the coating is about three to four inches deep for easier dipping. You can also add a little white candy coating when heating to create a lighter shade of green. Melt in the microwave in 30 second intervals on low, stirring in between. Repeat until melted and smooth.
- Remove a couple of shaped cake balls from the fridge at a time to work with.
- Dip the tip of a lollipop stick into the melted green candy coating and insert the stick into the bottom of Kermit’s head. Dip the entire cake pop into the bowl of melted candy coating. Dip and remove in one motion, without stirring. Make sure the entire cake ball is covered. Using a deep bowl is helpful here. If your coating is too thick, you can add a little vegetable oil or shortening to help thin it and make it easier to work with.
- Remove and allow any excess coating to fall off the pop and back into the bowl.
- Before the coating sets, place two round candies with white shells in position for the eyes. Repeat with remaining Kermit pops.
- Place in a styrofoam block to dry.
- When dry, pipe melted red candy coating on the bottom part of Kermit’s mouth and gently place a pink diamond jumbo sprinkle in position for the tongue.
- Use a toothpick to work red coating around sprinkle if necessary.
- When dry, use a toothpick to place a small amount of green candy coating around the bottom of Kermit’s head and place four green diamond sprinkles around the stick to form Kermit’s collar.
- Use a black edible ink pen to draw detain on the eyes.
- Let dry completely.
- You can wrap in treat bags tied with a ribbon and/or store them on the counter in an airtight container for several days, enjoy!
- Prep Time: 1 hour
