Let’s face it, I’ve never really been one for knick-knacks or decorating for the season. Christmas is probably the one exception where I break out a couple of family ugly Christmas sweater photos, hang lights on the house and decorate the Christmas tree. Yeah, I go all out! This year, I’ve put an emphasis on trying to get our new(ish) home decorated with projects that get at least some of those thousands upon thousands of digital photos printed and displayed so I was ecstatic when CVS Photo approached me with a challenge to create a few simple décor projects to dress up your home for the holidays.

With a location literally right across the street, I’ve time and time relied on their quick and easy online ordering at www.cvs.com/photo with same day pick-up over the years. With a crazy travel schedule up until this point, being able to create projects on the fly with access to my printed photos quickly has been incredibly convenient. Seeing as I overbooked myself (as usual) this year, I focused on creating quick and easy projects that can be accomplished in just a couple of hours. So here is what I came up with for my #CVSHolidayHowTo and I hope you enjoy!

Pin this for later!
Christmas Memories Lantern
I really love this project for two reasons. One, I’ve never seen them before and I love incorporating unique things into my home. Two, it transforms an existing piece of decor into a holiday piece in a way that isn’t permanent so after the holidays you can easily change it back! No extra space needed and no storage room required. Even better is that this literally took me about 5 minutes to put together :)
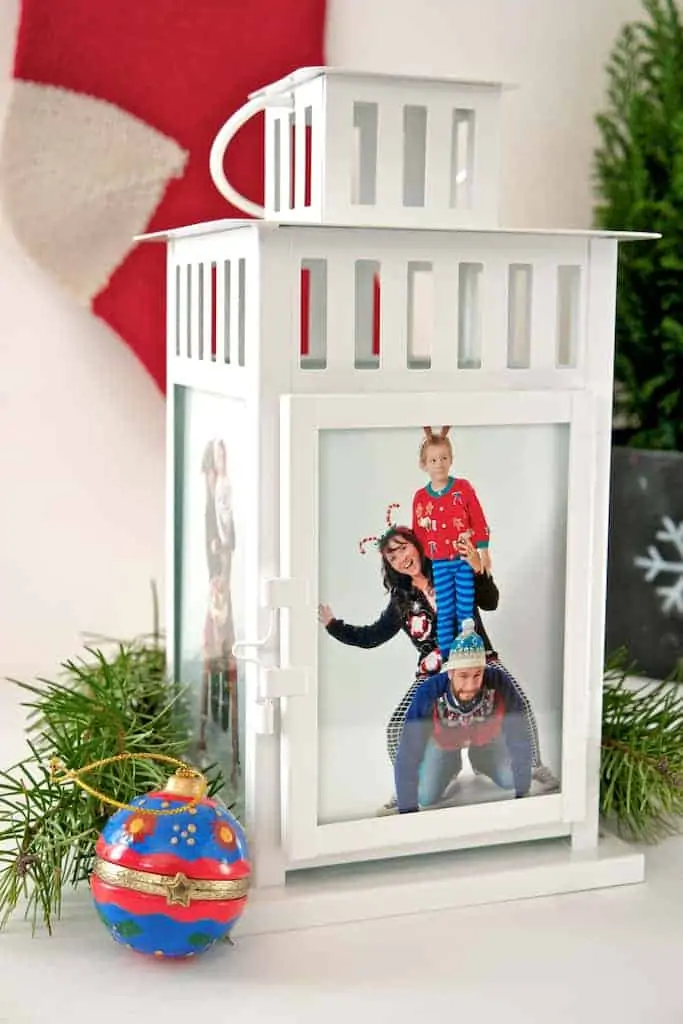 TIP: Change up the pictures each year to showcase a theme or maybe just your favorites from the current year.
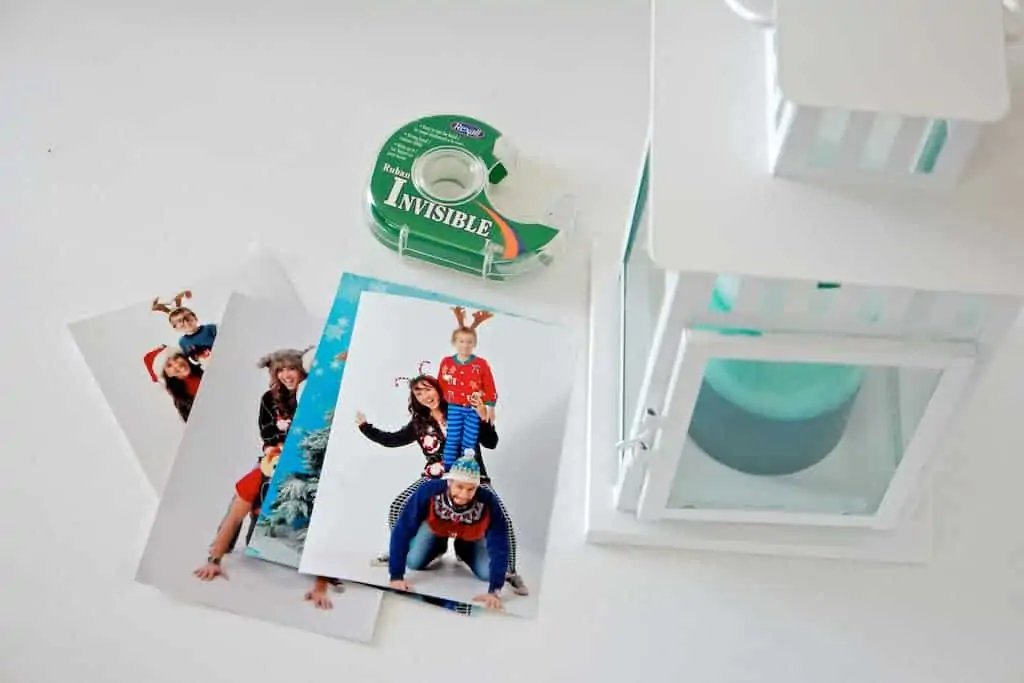
Materials Needed
IKEA Borrby Lantern
Four 4×6 photos in portrait orientation
Invisible tape
Craft Paper Trimmer or Scissors & ruler
Directions
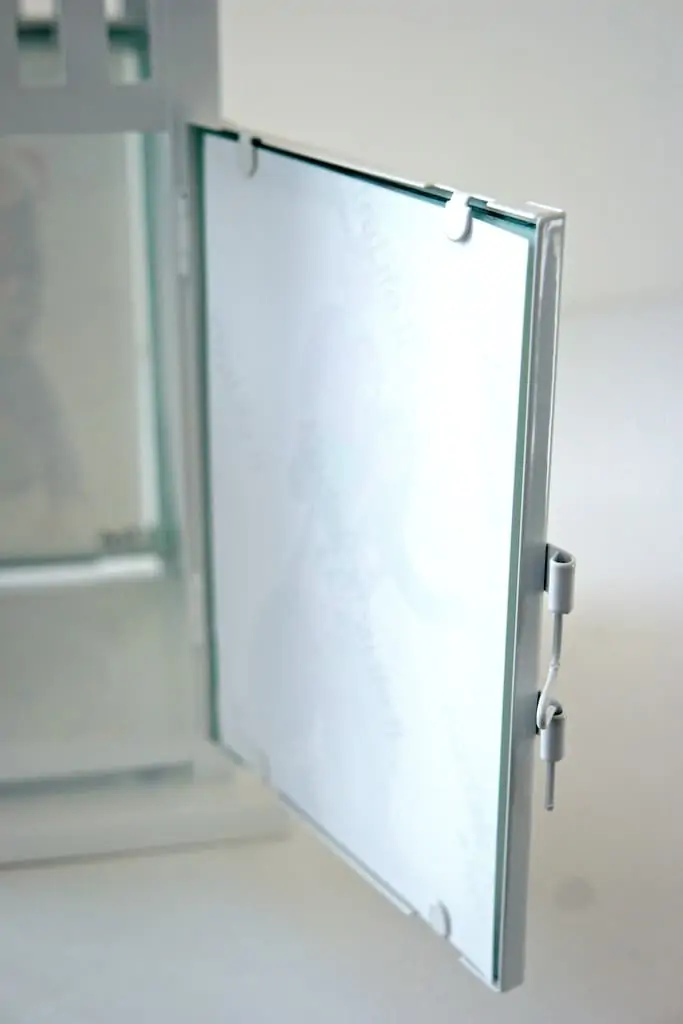
- Measure and trim a total of .25″ from the top and/or bottom of the photo you’d like to display on the front door and simply tuck into tabs.

- Place small amounts of tape onto the top corners of the remaining 3 photos and set into each window, carefully centering so that the clear space on each side is equal.

- Press top corners against the glass to hold the photo in place. NOTE: If you don’t want the sides to be clear, feel free to print 5×7 photos and then trim to fit the window exactly. You won’t need tape for this method! Personally I like the clear sides because it creates a nice glow effect around the photo when you turn on the candle :)
- Um yeah. That’s it. I told you it was easy peasy!I recommend using an electronic battery operated “flameless candle” to eliminate the possibility of the photos catching fire or melting.

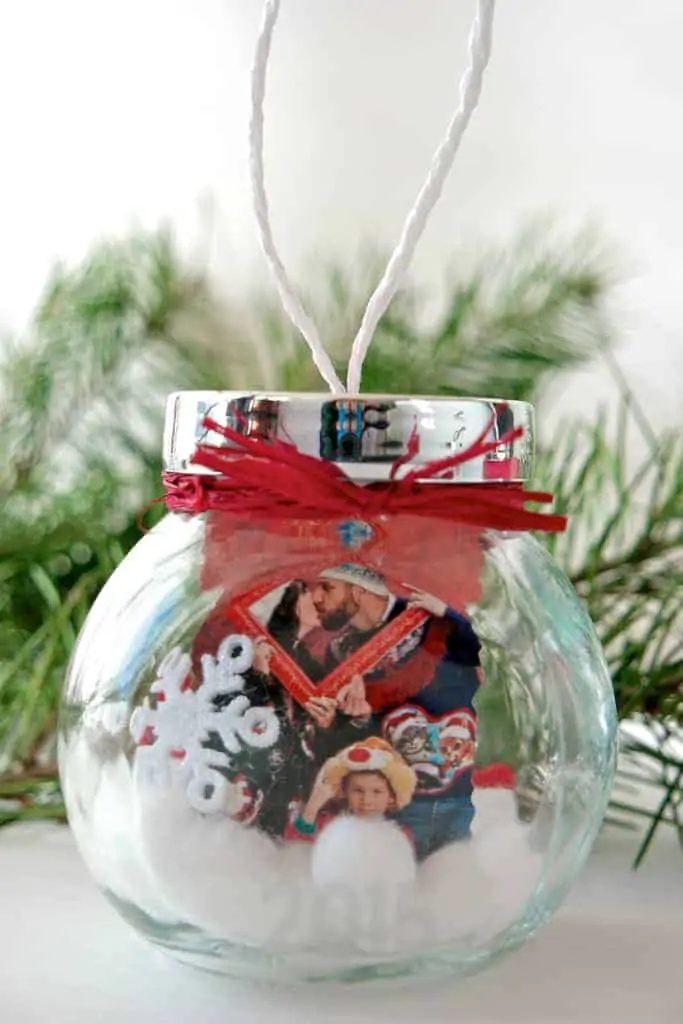
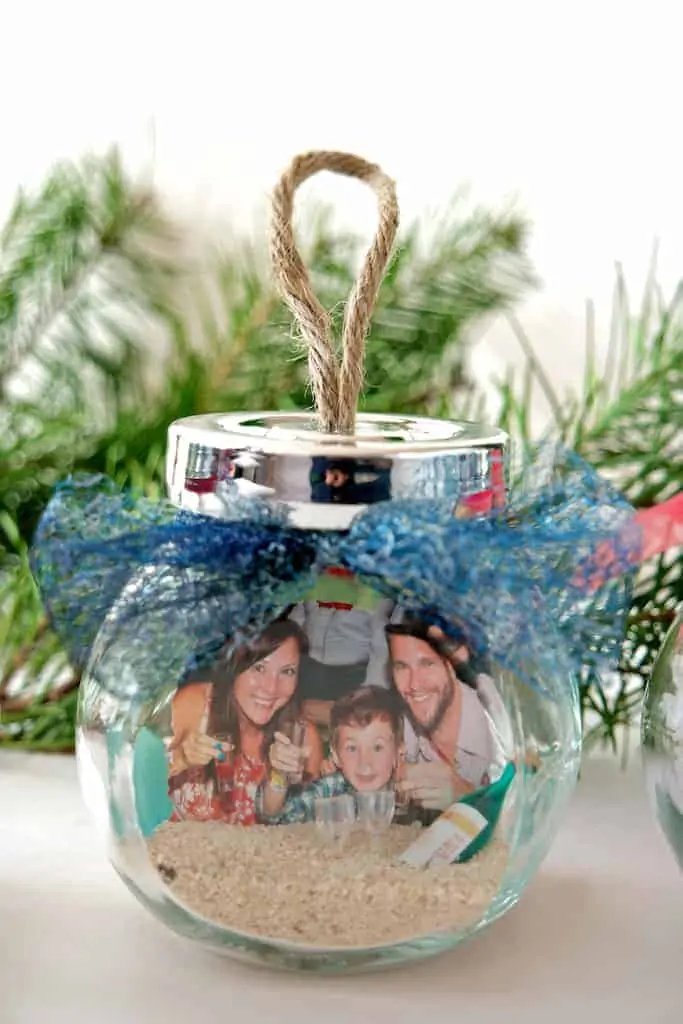
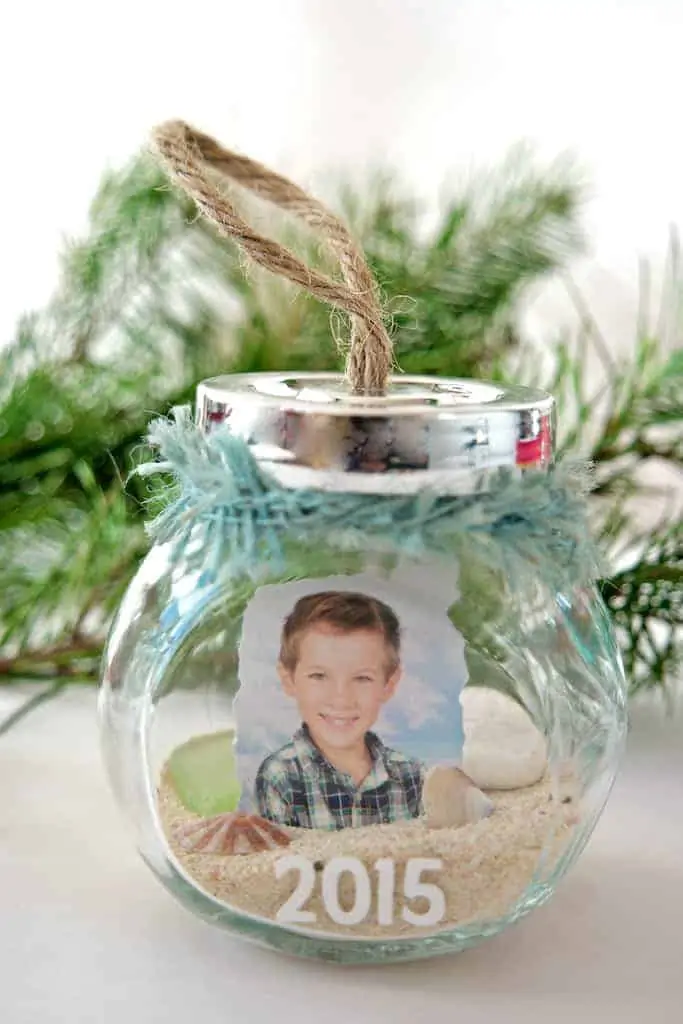
Memory Jar Ornaments

Materials Needed
Adobe Photoshop
JPG files of the photos you’d like to use
Decorative Edge Scissors
IKEA Rajtan Spice Jar (4 pack)
Various items that compliment your photo to place inside
Ribbon
Twine
Power Drill
Directions
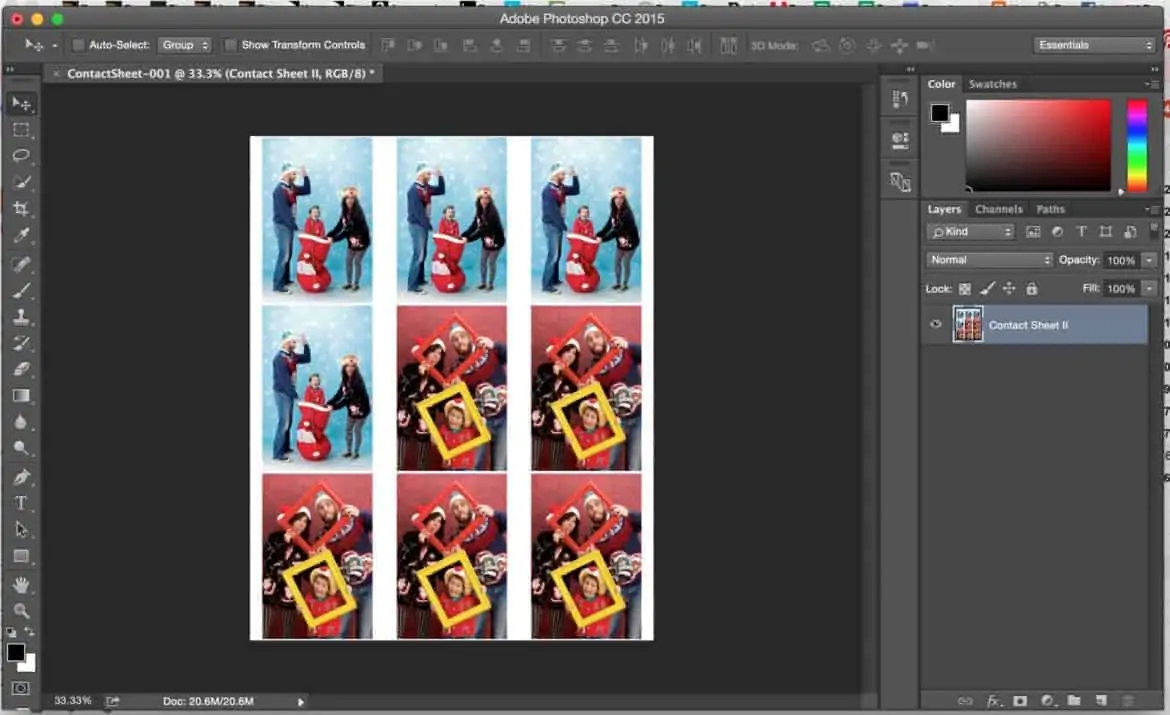
I used Photoshop’s Contact Sheet II feature to arrange multiple photos into one print. First create a folder somewhere on your computer and place all the photos you want to use in it. Note: they need to be in .jpg format.
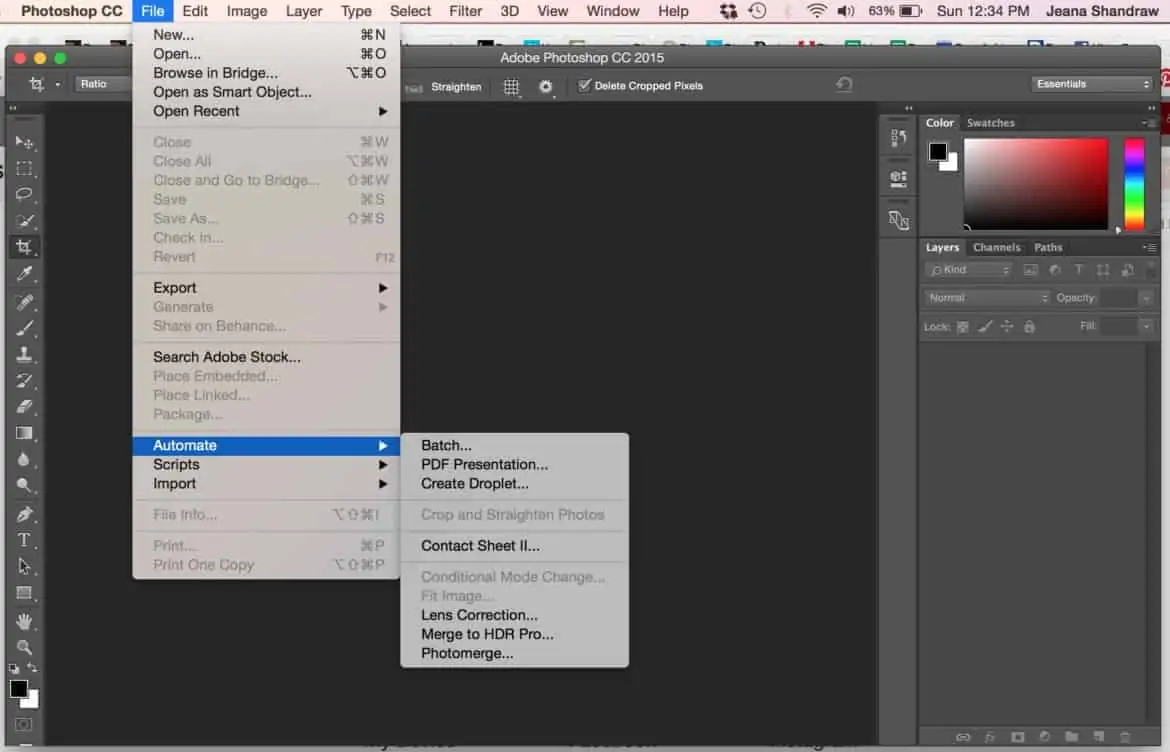
These are the settings you’ll want to use.
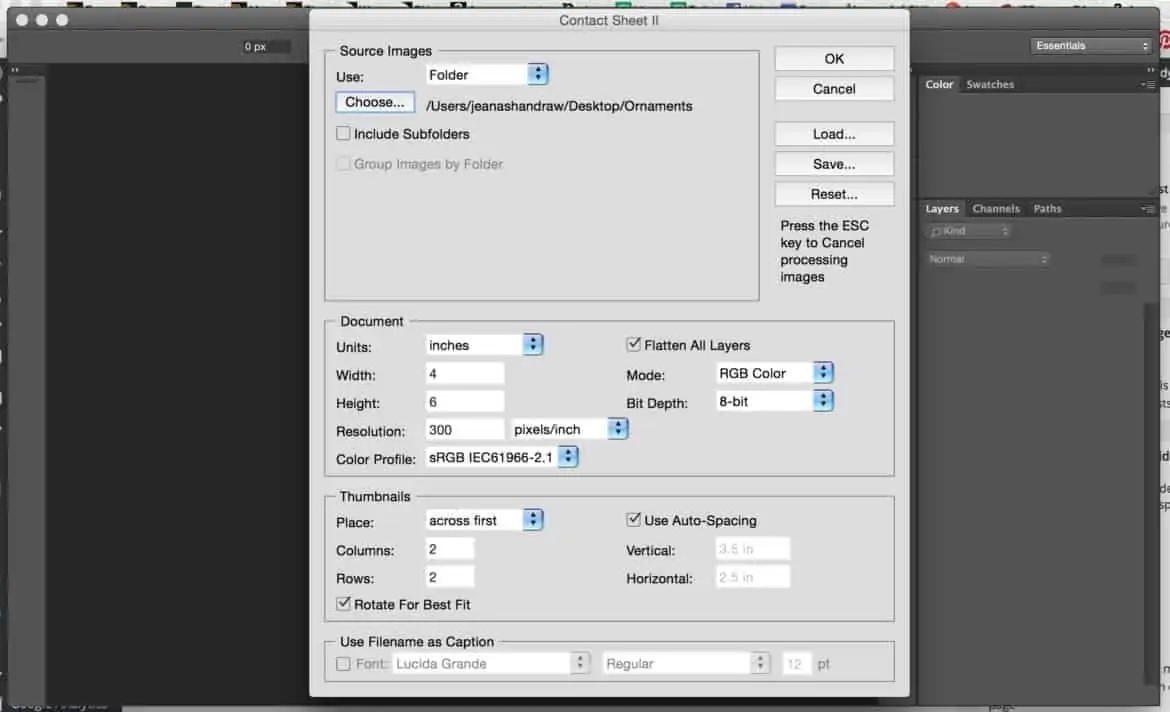
For this project, 4 photos to a 4×6 sized print is the perfect size. Just export the file as a .jpg and then upload to www.cvs.com/photo to print and pick up same day.

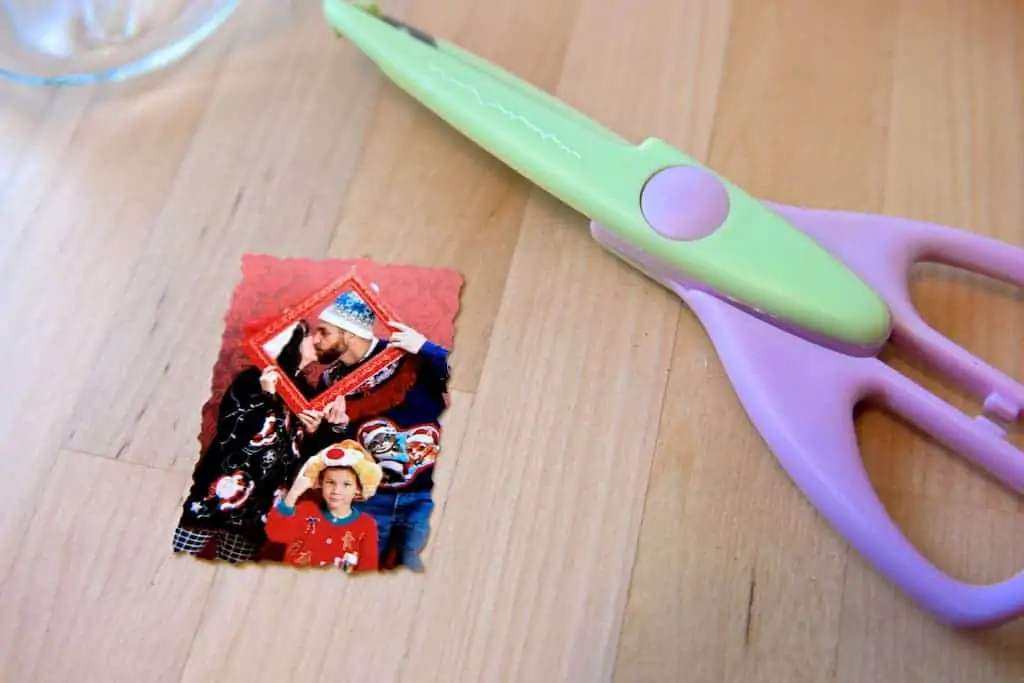
Cut photos into small rectangles about 1.75″ x 2.25″ (you have some wiggle room here so feel free to adjust). I used decorative edge scissors to give it some texture.
Place complimentary items into the spice jar.
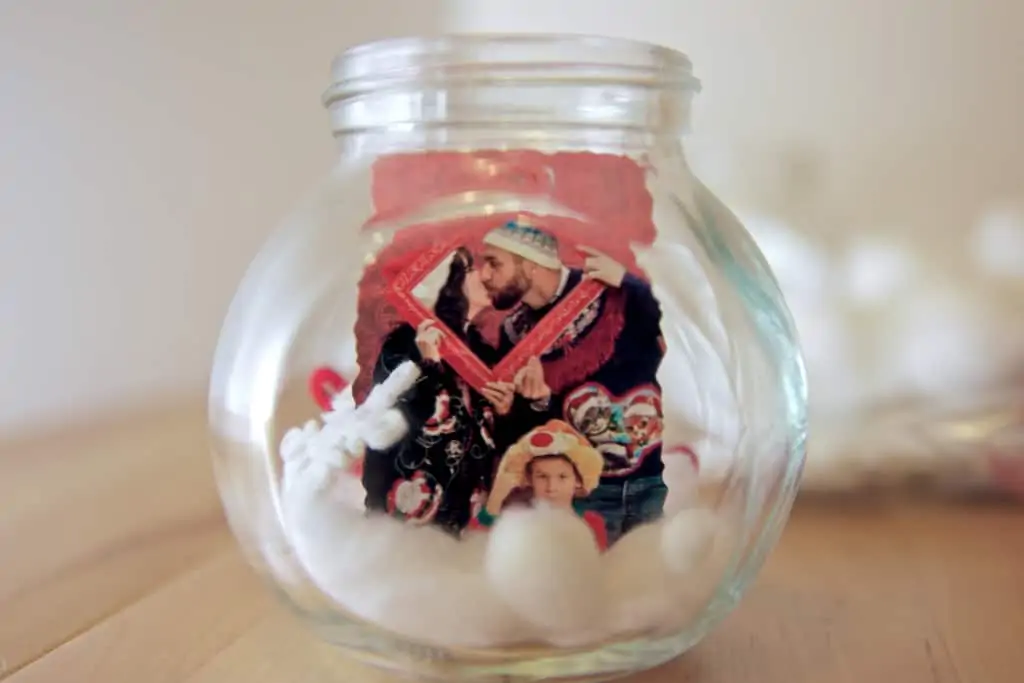 For instance I used pulled apart cotton balls and used felt holiday cutouts for my Christmas photos, and sand and shells brought back from the location plus miniature doll house accessories for the others. Be creative and use whatever helps depict that photographic memory for you.
NOTE: I enjoy the fact that these are not permanent (notice I didn’t use any glue or methods to lock down items inside) and can be changed/added to on a whim. If you’d like them to be less temporary, you’ll need to devise methods of making sure everything stays put. I’d recommend a hot glue gun and perhaps some mod podge as a start.
TIP: You can also place some potpourri or scent beads for a more complete sensory experience.
Carefully drill a hole into the center of each top. Cut 10″ long pieces of twine (or whatever you’d like to use as a hanger) and knot ends together to form a loop.
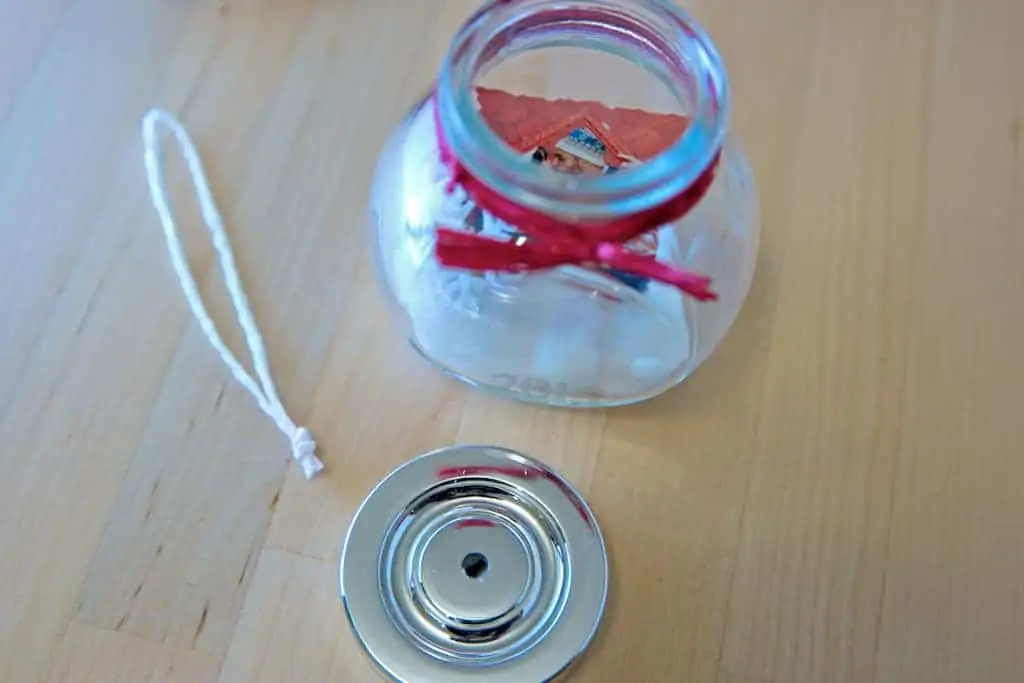
Push through from bottom so that the knot catches under the lid. Screw onto jar and decorate with ribbon and any additional exterior embellishments.
TIP: If you’d like to spend some more time to make these more elaborate, you could use paint markers, puffy paint, etching creme, etc on the exterior to further customize each “ornament”.
NOTE: These “ornaments” are meant to be displayed on counters or shelves as they would likely be too heavy to hang on the branches of a tree. But of course, feel free to give it a shot with the understanding that they are glass and could likely break if they fall.
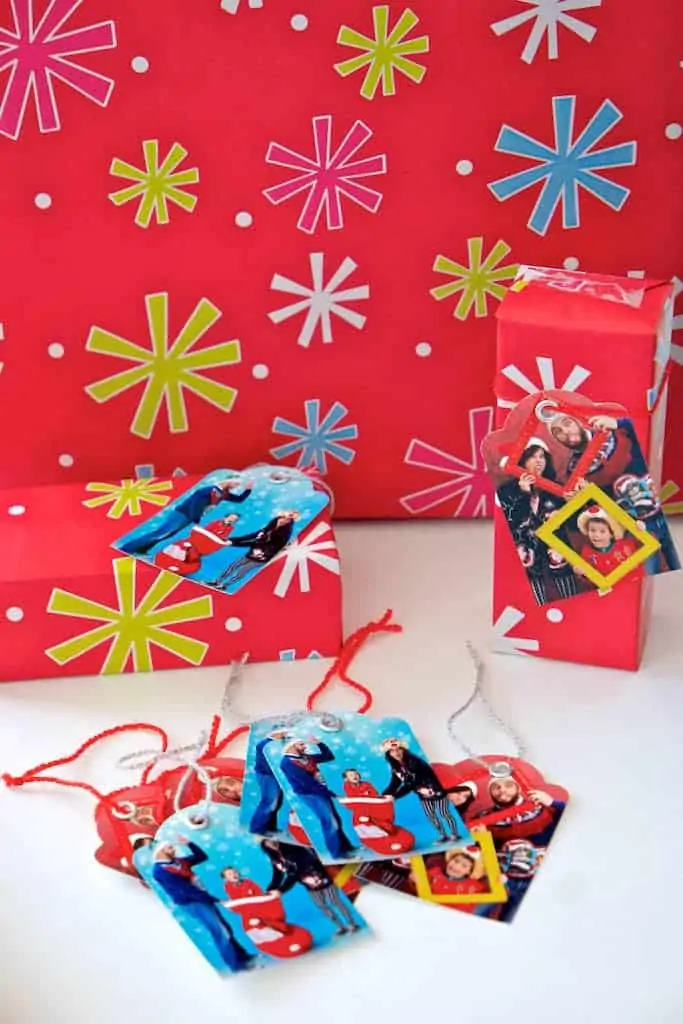
Christmas Gift Tags
I love either making personal gifts or personalizing the way they are presented. Making that extra effort goes a long way for thoughtfulness and showing them you care. Creating your own gift tags is an easy way to do just that. Choose Christmas themed photos like I did, or maybe your favorites from a family vacation. Best part about these is that they can be reused as Christmas Ornaments!
Materials Needed
Adobe Photoshop
JPG files of the photos you’d like to use
Craft Paper Trimmer or Scissors & ruler
Fiskars Tag Maker
3/16″ eyelets
Ribbon, yarn or thread
Directions
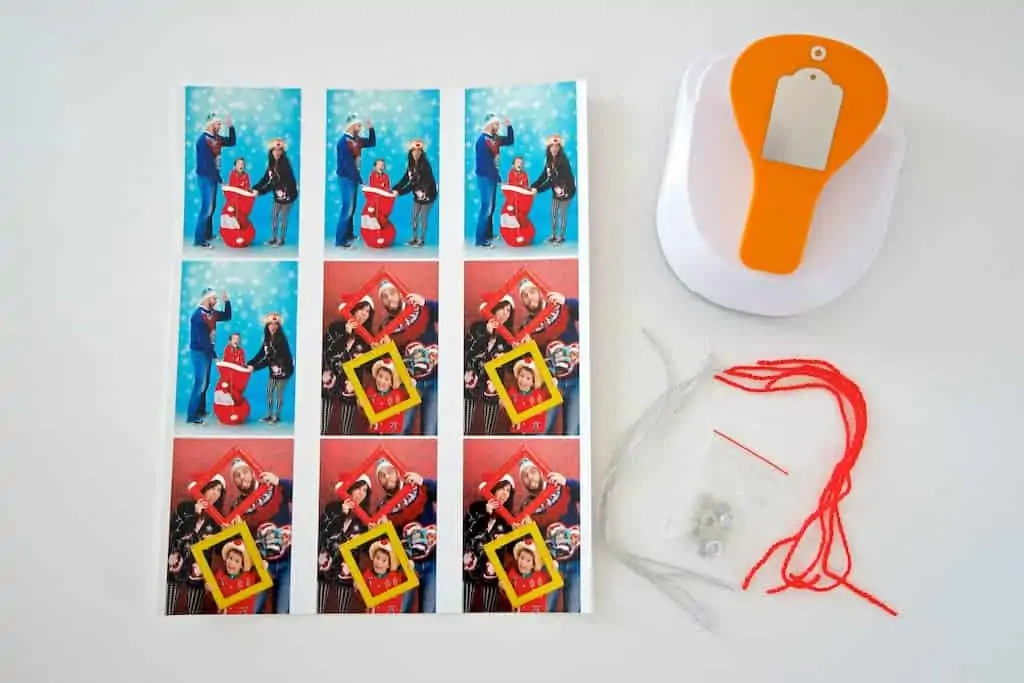
Once again I used Photoshop’s Contact Sheet II feature to arrange multiple photos into one print. First create a folder somewhere on your computer and place all the photos you want to use in it. Note: they need to be in .jpg format and if you want multiples of one picture, then make sure the folder contains multiple copies of that picture. For instance, if you want all to be the same picture, then place 9 copies of the photo in the folder.
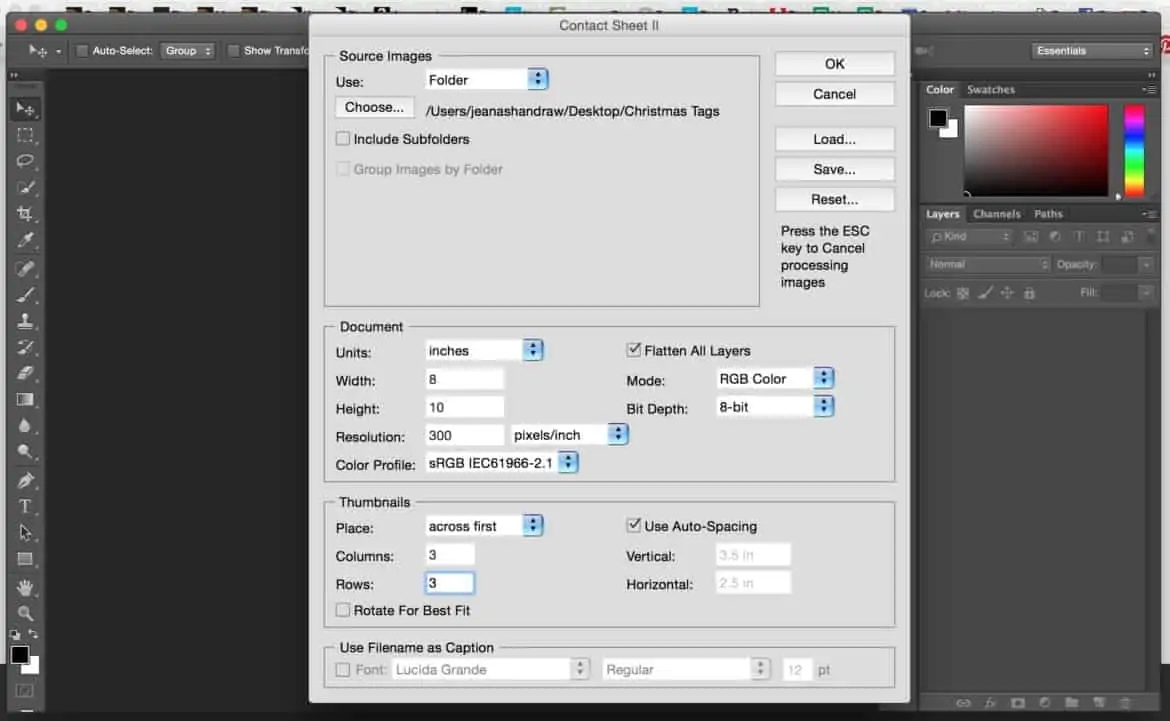
These are the settings you’ll want to use. It will produce 9 photos onto one 8×10 page. Export the file as a .jpg and then upload to www.cvs.com/photo to print and pick up same day.
I found it easiest to use my craft paper trimmer to cut the sheet into strips to them feed into the tag maker punch. Turn the punch upside down and feed photo in face up so you can see exactly what will be cut out. Once the tag is punched out, insert into the smaller slit to punch a hole and then place onto 3rd station to attach eyelet.
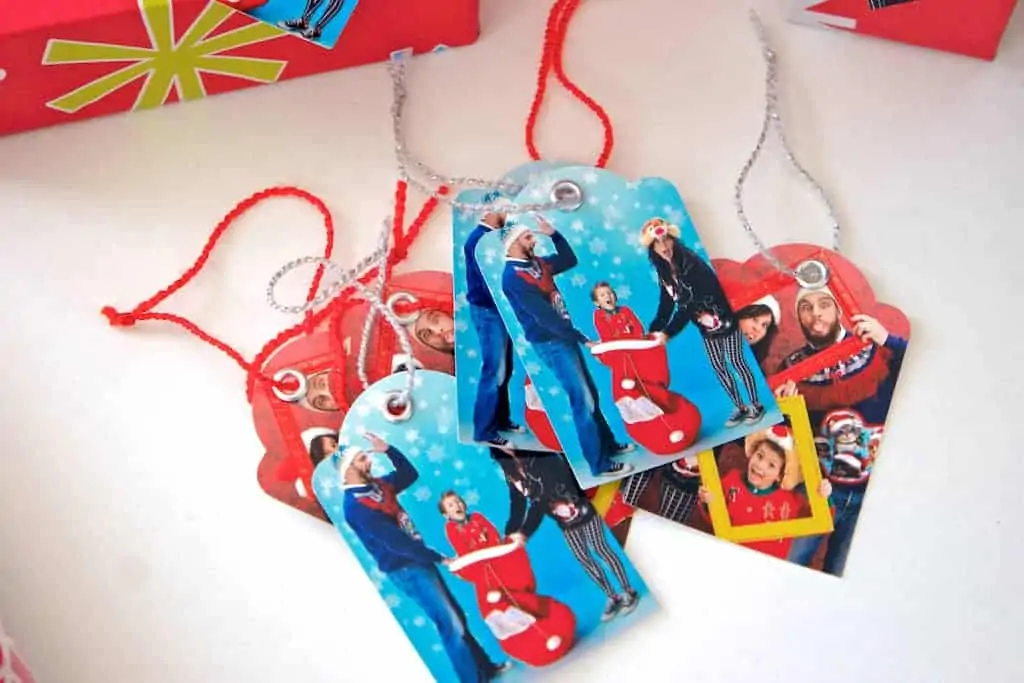
Attach matching ribbon, twine, string, and tada – you’re finished!
This post was produced for CVS Photo. All ideas and opinions remain my own.