Want to take your cell phone photography to the next level? Check out these useful iPhone photography tips, camera apps and editing software from a pro. Learn how to salvage pictures taken in poor conditions and make good pictures even better.
We always have our phones on us, so it’s only natural that we capture the most photos and videos of cherished memories on them. Cell phone cameras have come a long way and nowadays some even rival the point and shoots we grew up with.
One of the most popular and widely used cell phone devices today is the iPhone and it’s cameras have been instrumental in changing the landscape of cell phone photography. The latest model packs a huge punch with features like portrait mode.
I can’t wait to see what Apple announces at its special event on September 12th. Many tech influencers believe they will continue their tradition of announcing a new iPhone and many of us are hoping the camera will get even better.
This is a partnered post. All opinions remain my own.
If you own both an iPhone and an iPad you already know how well they marry everything from everyday tasks, work and play. They are a powerful duo that can tackle parenting woes as well as manage your smart home.
Still need to jump on the iPhone bandwagon? Maybe you’re in dire need of the newest model? Right now is a great time to take the leap and take advantage of AT&T’s latest promotion because you can buy any iPhone on AT&T Next® and get a 9.7” 32GB iPad for $99.99 with a 2-year wireless agreement! Now that’s an awesome deal!
[wc_box color=”info” text_align=”left” margin_top=”” margin_bottom=”” class=””]
When you’re ready, just follow these steps:
- Add any iPhone on AT&T Next to your cart
- Select any desired insurance and choose your plan, etc.
- While you’re still in the cart, choose “add another device” and select the 9.7″ 32gb iPad
- Once again select any desired insurance and add it to your plan
- Upon checkout, the iPad will show in the cart at the discounted offer price $99
[/wc_box]
Now that you’re set with the devices, let’s talk about how you can take your cell phone photography to the next level using secrets and knowledge from the pros.
Pin this for later!
8 iPhone Photography Tips from a Pro
Lighting, lighting, lighting
Golden hour, also known as the first and last hour of sunlight, is the optimal time for photographing outdoors. During this photographer’s magical hour, the sunlight is diffused, soft and very warm. In a word, dreamy. When you learn to work with the light it creates undeniably beautiful images. Likewise, Blue hour, the hour before (in the AM) or after (in the PM) golden hour, can also make for very interesting light. Since it’s a bit darker, it will require more patience and often times a tripod given the low light conditions.

If you’re attempting to shoot indoors, you will want to find light coming in through the windows at the brightest time of day. Place your subject near the window, but not in a direct path of sun rays. Stay in the “shade” and shoot from the left or right of the window to get optimum lighting on your subject. If you prefer a silhouette, shoot your subject from straight on facing the window, with your subject directly in front of it.
Why is lighting so important? Images with good lighting often have less noise, have fewer problems obtaining correct exposure and are always sharper than those taken in poor lighting situations.
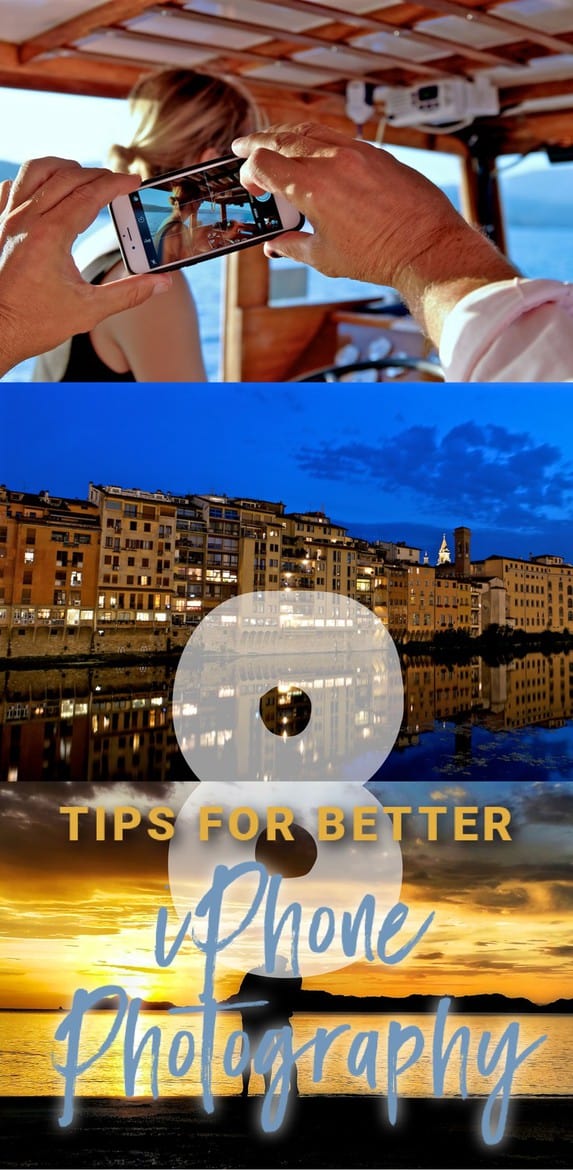
Change Your Perspective
You can create completely different photographs of the exact same thing just by changing your perspective. Look around and get creative. Try shooting from above or below. Get to eye level. Use the grid feature on your phone to follow the rule of thirds, which basically means you should align your subject with the guide lines and their intersection points.
If you’re taking a photo of a landscape, try placing the horizon on the top or bottom line. If you’re taking a portrait, try placing your subject’s eyes at one of the intersections.
The photo below is a great example of how the photographer is using the gridlines to place his subject (the woman) on the lines and within two-thirds of the frame. As an added bonus the photographer that shot this photo (me! lol), also used the rule of thirds to place the subject (this time the hands and phone) along a line. Overall the photo is much more pleasing to the eye than if all of this were centered in the frame.
Use Depth of Field
Even basic cameras can achieve some level of depth of field by physically placing your subject as far away from its background as possible and close to your camera. Depth of field separates your subject from its background to help images POP. The new iPhone 7 Plus offers the “portrait” setting that takes advantage of DOF.
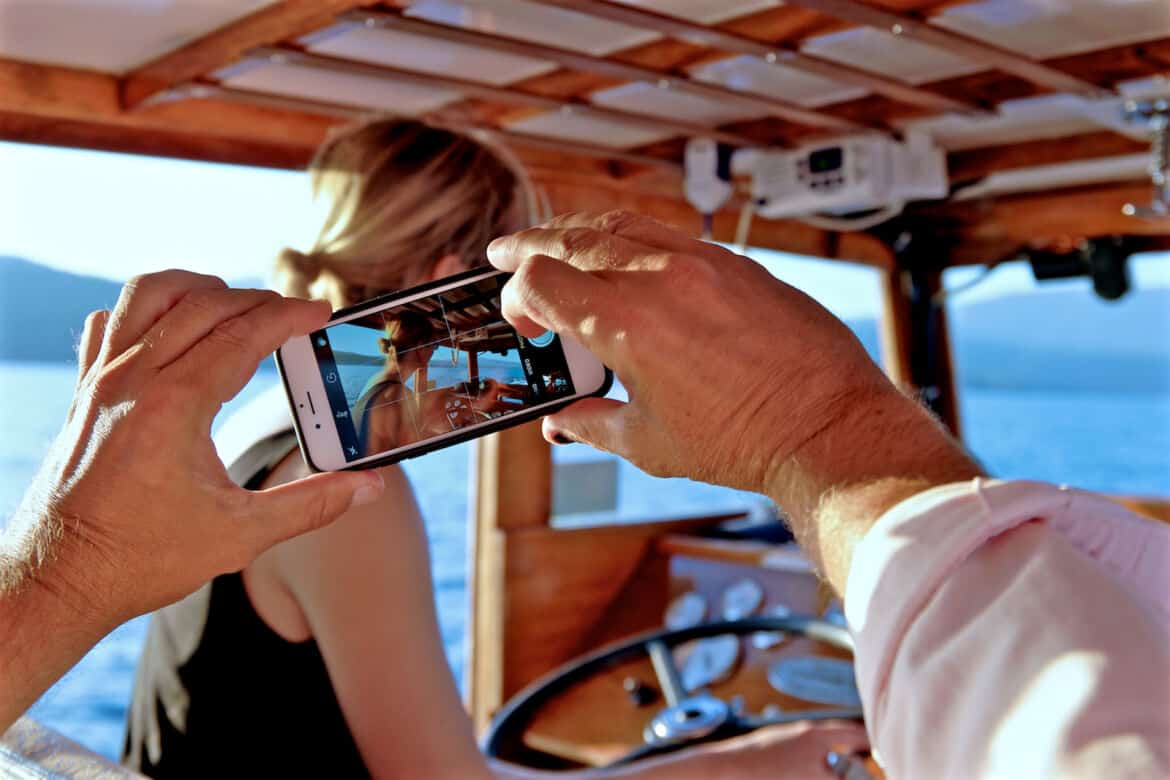
Always Select Your Focal Point
The more manual decisions you can make for your camera, the better an image will be. Even something as simple as taping your camera screen to select the focus point will yield a more accurate, sharper image. So always take the quick second to select your focus.
Use a photography app
ProCamera
ProCamera is an amazing app for iOS devices. It’s like having a tiny DSLR in your pocket with the ability to control shutter speed, ISO and exposure. Swap between wide angle and telephoto lenses and even set your aspect ratio to the standard 3:2. It also comes with features like a timer, rapid fire, display grids for proper composition and even a guide to warn you if your shot is tilted.
Other helpful features include the ability to shoot in Video and HDR modes, an anti-shake feature and a self-timer. Once your work is done, choose your format: RAW, TIF, JPG, or RAW + JPG.
It doesn’t get any more professional for your smartphone than this app. The app costs $4.99, and some of the features (like low light mode) are an additional $2.99, but it’s worth every penny and the original purchase gets you MOST of the features. The app also works with your Apple Watch as a remote control!
Lightroom for Mobile
Powered by the magic of Adobe Photoshop technology, Lightroom for Mobile lets you to create professional-quality images from your smartphone or tablet. Lightroom is hugely popular with professional photographers for desktop post-edits and the mobile app does not disappoint.
You can apply Exposure, Brightness, White Balance, Clarity, Shadows, Highlight and Contrast adjustments to the whole photo with the free app or even just select parts of it with the paid app. Bad lighting? Lightroom can fix that. Harsh shadows? Lightroom can fix it. Overexposed? Underexposed? Fixed.
It also has the power of Photoshop magic with five specially formulated shoot-through presets, which can be previewed and applied at capture and then adjusted afterward with full non-destructive capabilities. (Which means you’re not stuck with that filter forever.)
Then you can share your images right from Lightroom to Instagram, Facebook, Twitter, Flickr and more.
If you do happen to use the full version of Lightroom on your desktop, you can even sync your photos on both devices.

Adobe Photoshop Express
Like it’s counterpart, Lightroom, Adobe Photoshop Express features a ton of advanced editing options. Crop, straighten, remove red eyes, adjust brightness, control white balance and more. You can get even more control with add-on packs. The Advanced Pack allows you to reduce noise (crucial for lowlight situations or underexposed photos). You can even DeFog.
You can take and edit photos right from the app or edit previously captured photos – even those taken in RAW format.
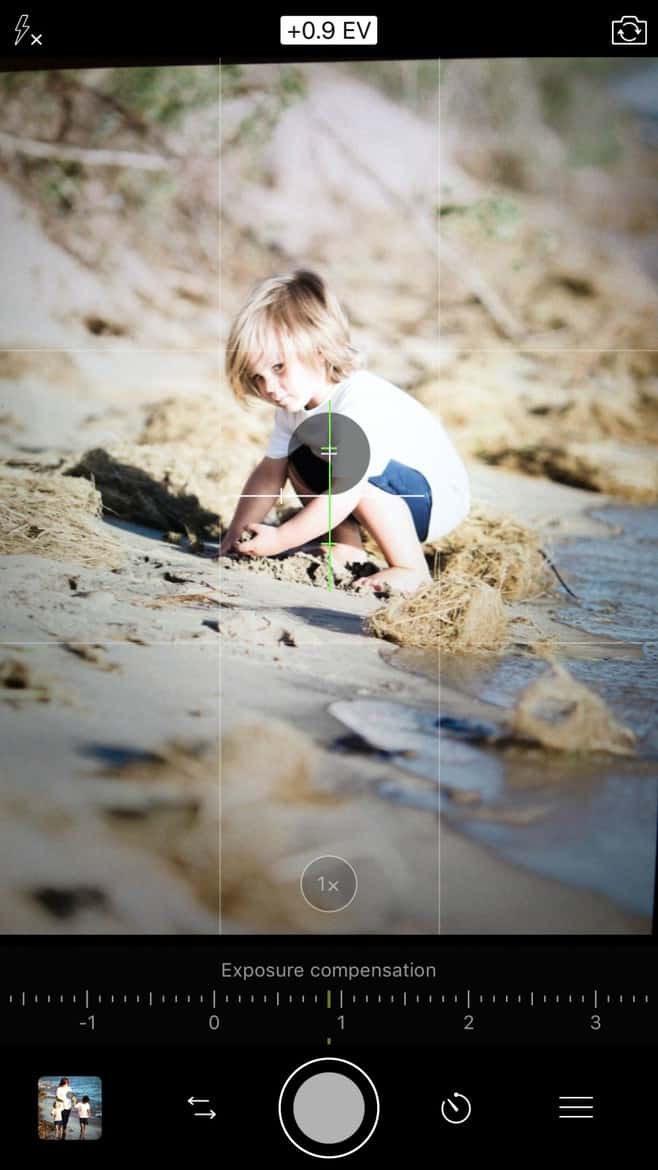
Use RAW Format Whenever Possible
All of the apps listed here allow you to capture and edit RAW format images. Unlike JPG, Raw images have not had any post processing done by the camera. Usually, this means images initially look a bit duller, flatter and less crisp. This is because it allows you to do it all in post processing. If you’re shooting in a tricky lighting situation like harsh shadows or poor lighting (churches can be the WORST), shooting in raw will allow you to salvage the image during processing later because the camera will not have made any previous, non-reversible automatic color adjustments for you.
For instance, in the photo above I was shooting after sunset, on a hazy day at the beach with humidity high. As we moved toward the water my lens fogged up ever so slightly. Using Lightroom (desktop version), I was able to correct the white balance, exposure, bring down my highlights and dehaze the image, turning a throw-away photo into one to be shared and cherished. Could this have been saved shot as JPEG? Probably. But I know I would have dealt with far more noise raising my exposure over two stops in post processing and the haze may not have been fixable.
For even more tips and tutorials, visit the photography section of the blog here.
I have to check out these photography apps. My children make fun of me saying I don’t maximize the use of my iPhone!
Thank you for sharing your photography tips. This is one thing I need to work on – taking better pictures and editing them. Once I learn this, I won’t have to bug my son to do it for me. :)